Cont. This part will describing setup of the Scratch and connecting iPhone.
NVM setup
1. NVM Install
[scratch@localhost ~]$ curl -o- https://raw.githubusercontent.com/creationix/nvm/v0.33.8/install.sh | bash

[scratch@localhost ~]$ echo 'export NVM_DIR="$HOME/.nvm"' >> .bash_profile

[scratch@localhost ~]$ echo '[ -s "$NVM_DIR/nvm.sh" ] && . "$NVM_DIR/nvm.sh"' >> .bash_profile

[scratch@localhost ~]$ source .bash_profile

[scratch@localhost ~]$ nvm install --lts

[scratch@localhost ~]$ nvm use --lts

[scratch@localhost ~]$ sudo yum install git
Server/HTTPD setup
1. Additional packages and httpd install
[scratch@localhost ~]$ sudo yum install epel-release

[scratch@localhost ~]$ sudo yum install http://rpms.famillecollet.com/enterprise/remi-release-7.rpm

[scratch@localhost ~]$ sudo yum install httpd

[scratch@localhost ~]$ sudo systemctl start httpd

[scratch@localhost ~]$ sudo systemctl enable httpd
Scratch setup
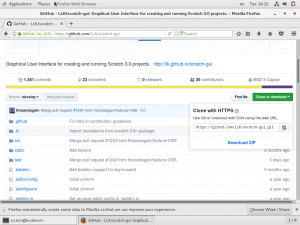
1. Download scratch source code from https://github.com/LLK/scratch-gui, click [clone or download] -> [Download zip] -> [Save File] -> [OK]
2. unzip and install
[scratch@localhost ~]$ cd

[scratch@localhost ~]$ unzip Downloads/scratch-gui-develop.zip

[scratch@localhost ~]$ cd scratch-gui-develop

[scratch@localhost ~]$ npm install

[scratch@localhost ~]$ npm run build

[scratch@localhost ~]$ sudo cp -r build/* /var/www/html
Server settings and port open
[scratch@localhost ~]$ sudo groupadd www

[scratch@localhost ~]$ sudo usermod -a -G www scratch

[scratch@localhost ~]$ sudo chown -R root:www /var/www

[scratch@localhost ~]$ sudo chmod 2775 /var/www

[scratch@localhost ~]$ find /var/www -type d -exec sudo chmod 2775 {} +

[scratch@localhost ~]$ find /var/www -type f -exec sudo chmod 0664 {} +

[scratch@localhost ~]$ firewall-cmd --permanent --zone=public --add-service=http

[scratch@localhost ~]$ firewall-cmd --reload
Setup done
Access to: http://192.168.56.101 from Safari on your MacBook.
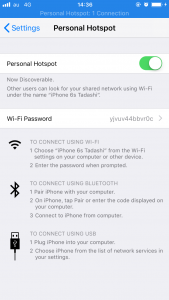
Wi-Fi Access Point setup
1. Connect to iPhone with USB cable
2. Personal Hotspot enable on the iPhone
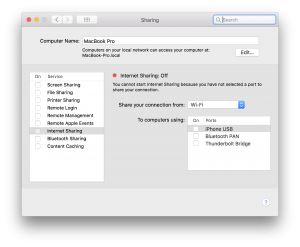
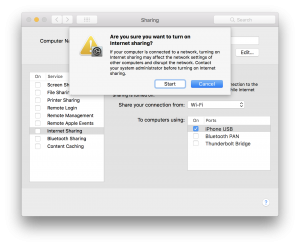
3. Enable Internet sharing
– go to [System Preference] -> [Sharing]
– select [Share your connection from:] “Wi-Fi”
– select [To computers using:] “iPhone USB”
– click “Internet Sharing” -> [Start]
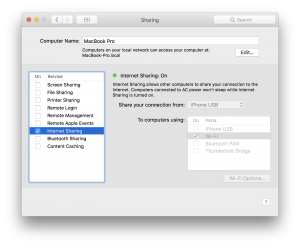
– Network icon will be changed ![]()
VirtualBox VM reboot
1. VM Power off (If it’s running)
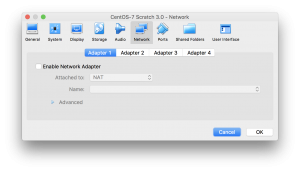
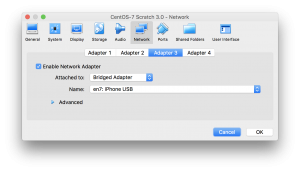
2. Network Adapter should be changed
– Adapter 1 and 2 is disable
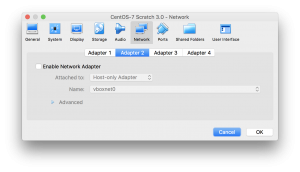
– Adapter 3 should be changed to Bridge Adapter and Name is set to the “iPhone USB” -> [OK]
3. VirtualBox [Start] -> Memo IP Address “170.20.10.XX”
All setup done.
1. Connect to the “MacBook” over Wi-FI from other PCs.
2. Open “170.20.10.XX” by Internet Browser from other PCs.
Go to: Setup Scratch 3.0 server on the VirtualBox, CentOS, for macOS – 1/2

